Saturday, August 3, 2013

Eggs Made Incredible

The other day, my maternal uncle was telling me how much he enjoyed eggs, regardless of how they were made. This conversation took me back to a recipe that my husband had pointed me to.

My husband loves good food, but he would rather leave the cooking to me.  He does, however, browse the internet in search of a good recipe and then I try it out.  We make the necessary modifications without straying to far away from the original dish.  

Many of the recipes I have been pointed to come from Jacques Pepin, whom I now regard nothing short of a culinary genius.  I don't regularly watch any of his shows, but the little bits and pieces of information I have picked up from him over the years have been so helpful.  For example, I remember hearing from him about 20 years ago that soaking dried beans in water begins the germination process with makes them generate more gas.  The preferred method of re-hydration would be to pressure cook them.  Who knew?  But I digress.  Jacques Pepin has a show called "More Fast Food My Way".  This show is the source for many of the recipes I have tried.  Some of the recipes are available in print on the internet, but for others I have had to watch the entire episode (available on youtube or here) to gather as much information as I can, and then wing it.  The results of my experiments remind me of a line from the Kenny Rogers Chicken episode of Seinfeld: "Not Fast Food, but good food quickly".  This was probably what the culinary anti-Christ Sandra Lee is aiming for, but she falls hopelessly on her face.  While Pepin combines ingredients with finesse and ends up with elegant results, Sandra Lee schleps together a host of sodium-laden canned and bottled prepared foods and ends up with what my Sandra-Lee-hating-sisters would describe as "craptacular".  But again, we'll save the Sandra-bashing for another blog.

Back to Jacques Pepin, I am just awed at how he can take a humble boiled egg and elevate it to gastronomic nirvana.  If you read the recipe, you may not even believe that the ingredients would combine, let alone result in something that tastes so good.  But trust me when I say that it does.  

The first time I tried this recipe was when my husband and I were in Hawaii.  We were fortunate enough to have access to a lovely house, complete with a full kitchen.  We didn't have mayonnaise at hand, nor did we want to shell out $ 6 for a tiny little bottle of it, so we substituted it with ranch dressing.  That was about the only substitution we made, but since we had nothing to compare our first attempt to, we were blown away by how good it tasted.  Our second attempt was pretty much as soon as we got back home.  The mayonnaise made a huge difference.  We have also forgone the anchovies for smoked salmon, because my husband is not a big fan of the incredibly fishy aftertaste from anchovies.  

Okay then, here we go.

The first step is to boil the eggs.  You're probably wondering why I would spend time on going over how to boil eggs.  I guess it's because despite being somewhat of a culinary aficionado, I didn't know how to do this right.  It wasn't important to our family growing up that boiled eggs not have a green and ugly yolk. I also like the middle of the egg yolk to not be all the way cooked, but not runny either.  So depending on how you like your eggs boiled, here's how to achieve the desired results.

Begin by bringing 3 cups of water to a rolling boil.  

Slowly immerse two eggs into the boiling water, ensuring that they are fully covered.  Boil the eggs for exactly 9 minutes.  


Have on hand a bowl of cold water with ice.  Remove the eggs from the boiling water and shock them by dunking in the ice water.  Allow the eggs to cool well before peeling them.  Eggs cooked this way will result in the way I like them, slightly under-cooked but not runny in the middle.  If you like the yolks runny, cook for about 7 minutes.  If you prefer your eggs well cooked, bring the eggs to room temperature before boiling and then use cold water without the ice to cool them.  

While the eggs are boiling, chop fine a shallot or part of a small red onion.  

In a little bowl, combine 1 teaspoon mayonnaise, 1 teaspoon tomato ketchup and a few drops Tabasco sauce and mix well.


When the eggs are ready, slice each one in half.


I will admit that the eggs captured in the above image are slightly overdone, but most people enjoy their eggs this way.

Finally, put the dish together.  Top the eggs with the sauce.  Garnish with the red onions or shallots, and a few capers.  Add two anchovies or a thin slice of smoked salmon on top.

Voila.


All you need is a mimosa to wash it down.  Enjoy!


Saturday, March 31, 2012

Fish cooked in Banana Leaves

Traditionally known as Patra ni Machhi, this is by far one of my favorites.  A whole fish with a tangy and flavorful green masala, wrapped in a banana leaf and cooked.  I first partook of this when I was in my early teens, at a Navjot, a coming-of-age religious ceremony celebrated by people of Zoroastrian faith.   Years later, our family welcomed a sister-in-law of the same faith, who has helped me refine this dish.  She suggested that I use a powder rub prior adding the green masala.  My sister-in-law also recommended the use a small ball of dry tamarind instead of the lime juice.  She also suggested the various different ways of cooking this fish.  


You will need:

2 large White Pomfret or Golden Pompano fish (available in Asian Stores)
3 + 2 tsp coarse kosher salt
1 tsp turmeric powder
2 tsp red chili powder
I large pod garlic, peeled and separated into cloves
1 inch piece ginger, peeled and sliced
6 thai green peppers
Juice from two limes
2 cups chopped cilantro
1 cup cream of coconut, or fresh ground coconut paste
2 tsp sugar (optional)

You will also need:

  • One large banana leaf (available in the frozen section in Asian stores.  You will get better results if you are able to lay your hands on a fresh, green banana leaf, although hard to find)
  • Aluminum Foil
While I prefer to bake this fish, you can also steam or poach it.  If you decide to steam or poach, make sure to double-wrap in foil so that no liquid seeps out during the cooking process.  It will also need to be cooked longer as the heat needs to work its way through three layers of wrapping.

Most Asian stores that sell these fish will gut and clean them for you.  Ask to have the head, fins and tail removed. 

·  Bring the fish to room temperature.  Scale and then score the fish with 3-4 deep cuts on each side.
·  Make a rub by mixing together 3 tsp salt, the turmeric and chili powder.  

·  Use this rub all over the fish, including in the body cavity, the slits and the top and bottom surfaces.
·  Preheat the oven to 375 degrees.  If steaming or poaching, you can begin to heat the water later.

·  In a blender, coarse grind garlic, ginger, Thai Peppers and Lime Juice.  

·  Add Cilantro and Cream of Coconut and remaining salt.  Puree to a smooth paste.

·  Wipe down banana leaves with a paper towel.
·  Cut or tear the banana leaf into two halves
·  Place each banana leaf half on a large piece of foil.
·  If steaming or poaching, bring 8 cups of water to a boil in a large pan

·  Spread each fish generously on both sides with the cilantro-coconut paste, inside the body cavity, in the slits and on the top. 
·  Place the fish on the banana leaf.  Fold the banana leaf over the fish, then wrap the foil around the banana leaf to make a tightly-wrapped package.

·  Place the foil-wrapped fish on a baking tray, fold-side down.  Bake for 20 minutes, then turn over and bake for another 20 minutes.  
·  If steaming the fish, place the foil-wrapped in a steamer over boiling water and cook for about 1/2 hour on each side.
·  If poaching, add the foil-wrapped fish directly into the water, turn down the heat and cook for about 1/2 hour on each side.
·  Remove the baking tray from the oven.  If steamed or poached, remove the fish from the steamer or the water. Allow the fish to sit for about 10 minutes before unwrapping.
·  Carefully open the foil wrap and banana leaf.     
·  Cut each fish in half and serve over white rice and accompanied by a simple chopped salad.  Serves 4.

Sunday, November 13, 2011

Ming-ing It

Ming Tsai is easily one of my favorite chefs on television today.  I first began watching his show "East Meets West" back in the day when Food Network had shows worth watching.  After I gave up cable television, I was delighted to come upon another show called "Simply Ming", which airs on the local PBS Create channel.  I don't get to watch the show as often as I would like to, but because of the wonderful World Wide Web I have full access to the recipes of the food cooked on the show.  Ming usually makes a base ingredient from scratch and then uses this in three or four recipes.


I had heard of the "Black Bean and Garlic Sauce" episode where it was made from scratch and then used in Stir-Fried Clams, a pork dish, and with Beef and Eggplant.  I did the Black Bean Sauce from scratch thing.  It was delicious, but it was also time-consuming.  I wondered if I couldn't just use a commercial Black Bean Sauce and doctor it up.  So that's what I did. Armed with a bottle of Lee Kum Kee brand Black Bean and Garlic Sauce, along with Ming's Tsai's recipe for Beef and Eggplant, I embarked on my food adventure.  As the recipe suggested, I bought some Japanese Eggplant.  They are a lighter purple and longer and thinner than their American counterpart, with less visible seeds.  The flesh cooks up sweet and delicious and holds its shape well.  Instead of a flank steak, I opted for a flatiron which happened to be on sale.  I also prefer this cut because of its lower fat content.  I had a bottle of rice wine from my attempt at Black Bean Sauce from scratch, which I bought at an Asian Supermarket for about $2.99.  My pantry always, always has a bottle of Sambal Oelek because I love this versatile hot chili sauce and what it brings to any dish to which it is added.


The dish took about 30 minutes to prepare and cook.  I served it on a bed of white rice.  Below is the recipe.  Be warned  that I like my food spicy, and you may want to cut back on the Sambal Oelek.  I also cut back on any additional salt, as I felt the commercial Black Bean Sauce had more than a sufficient amount to carry through the dish.  I need to remember to take pictures for my blog when I cook and post these recipes!  Oh well, maybe I'll remember the next time. In the meanwhile, enjoy!  (PS: I made this again and remembered to take a picture this time!)


WOK-STIRRED BEEF WITH EGGPLANT AND BLACK BEAN SAUCE

2 medium Japanese eggplant, cut into 1/2 inch dice
2 tablespoons canola oil
1 pound flat iron steak cut into thin strips and 1 1/2 inch long
1 bunch green onions, sliced, white and green portions separated
3 cloves garlic, crushed
2 tablespoons Sambal Oelek
2 tablespoons black bean and garlic sauce
A generous pinch of ground black pepper
1/4 cup rice wine
1 tsp sugar
A few drops sesame oil


Heat a large wok.  Add 1 tablespoon oil and swirl around to coat the bottom.

Add the eggplant and cook for about 10 minutes, stirring constantly, until browned all over but still firm.  

Set the eggplant aside.  Add the remaining oil and heat well.

Add the beef and stir-fry quickly until no longer pink.  

Add the garlic and white portion of green onions, and continue to stir-fry.

Add Sambal, continue stir-frying for a few minutes.

Add black bean sauce and pepper.

Add the eggplant and continue stir-frying.

Cook on high heat until all liquid has evaporated.

Add the green onions and cook until no longer raw.

Add rice wine and sugar.  Stir well.

Cook covered, on medium heat 5-7 minutes, until the eggplant is soft.

Remove wok from heat and drizzle sesame oil on top.

Serve immediately on a bed of steamed white rice.

    Sunday, October 23, 2011

    Mexican Food - La Segunda Parte

    After the success of the Chilorio Burritas I made, I was ready to take on another recipe by Pati Jinich.  I think of Pati as a modern day Mexican Julia Child, if you will.  She has a flair for cooking that brings together common ingredients into a symphonic blend of flavor, texture and hearty goodness in a truly delicious dish.  

    When I looked up the recipes on Pati's website, I was intrigued by a recipe for Pork Tenderloin in a Sweet Citrus Sauce. It involved marinating the tenderloin in orange juice, lime juice, vinegar and spices for 24 hours.  The kicker: it had to be marinated and then cooked in banana leaves.  So off I went to procure the ingredients.  I bought the tenderloin at my local Costco.  Whenever a recipe calls for orange juice, I use Florida's Natural with Most Pulp.  I always use raw apple cider vinegar, not the distilled kind.  I scored with the limes as I found them available at 19 cents each!  I couldn't easily find piloncillo, so I used jaggery instead.  Now for the banana leaves.  Those were more challenging to find, but I finally managed to get a package of frozen banana leaves at an Asian store.   

    Upon reading the recipe for the second time, I began to wonder if the ingredients would render enough flavor.  5 lbs of tenderloin only required 3/4 tsp black pepper and not a whole lot else.  I upped the flavor by using a smaller tenderloin and more flavoring ingredients.  I served the sliced pork tenderloin between a cut up torta roll, with some fresh pico de gallo.  Delicioso!   

    If you try this recipe, be warned that it requires some planning and time.  It doesn't take much prep time, but plan for the marination and cooking.  Here are some additional tips:
    •  Thaw the frozen banana leaves for about an hour in room temperature.  
    •  Marinate the meat in the refrigerator for a minimum of 24 hours before cooking, for best flavor
    • Bring the meat to room temperature before cooking.  This will take an hour or two.
    • The additional salt and pepper is used for lightly crusting the tenderloin before sear 
    As always, feedback is very much appreciated. 

    ¡Buen provecho


    PORK TENDERLOIN IN A SWEET CITRUS SAUCE
    Lomo de Cerdo con Salsa Dulce de Citricos 


    2 cups orange juice
    1/2 cup lime juice
    6 tbsp apple cider vinegar
    1 cup shredded piloncillo, jaggery or brown sugar
    8 garlic cloves, pressed or minced
    1 tsp kosher or sea salt

    2 tsp ground black pepper
    5 bay leaves
    4 whole banana leaves
    2 lbs pork tenderloin
    Additional 1/2 tsp kosher or sea salt
    Additional 1/2 tsp ground black pepper

    2 tbsp safflower or corn oil


    To make the marinade: mix together the orange and lime juice, vinegar, piloncillo, garlic, salt, pepper and bay leaves in a bowl.  


    Begin to layer the banana leaves in a large baking dish, alternating horizontally and vertically.  Place the meat in the middle of the leaf bundle.  Pour the marinade on the top and cover  the meat with each of the banana leaf layers on all sides.  Marinate overnight in the refrigerator, turning the meat over every 2 hours during the marination process.

    Preheat the oven to 350 degrees.  Unwrap the pork from the banana leaves.

    Heat the oil in a large skillet.  Sprinkle the pork with the additional salt and pepper, place it in the pan, and sear thoroughly on all sides until well browned.

    Place the tenderloin back in the banana leaves and bundle it again.  Bake the wrapped pork into the oven for 1 1/2 to 2 hours.  When done, carefully open up and unfold the banana leaves.  Remove the meat from the dish to rest on a cutting board.  Pour all the marinade into a saucepan and set over medium high heat, for about 10 to 15 minutes, to reduce to 1/3 of its volume.

    Slice the meat at about 1/2" thickness or thinner if you prefer.  Place the slices on a platter, drizzle some of the sauce on top and serve.


    Saturday, October 1, 2011

    Simplifying Indian Cuisine

    Indian food is believed to be too complicated to cook, and not without reason I suppose.  There is a lot of prep work that goes into creating a dish.  Finely chopped onions are an integral part of a dish, as are ginger, garlic and freshly ground spices.  But not all Indian food necessarily has to include all these components.  Think if you will in terms of Thanksgiving dinner and then compare that to what you would normally fix for dinner.  The same can be accomplished when you think Indian food.  All you need are a few ingredients and a little imagination.

    I have a few quick and easy recipes up my sleeve.  Some of these are my own, while others have been shared with me from wonderful people to whom I will be forever grateful.  In an effort to pay it forward, I am sharing with you one of my recipes that I think is almost ridiculous in its simplicity to make.  The main ingredient is a staple in my pantry, Pickle Masala.  It is available in any Indian grocery store. My favorite brand is "Deep", and is a combination of split mustard, split fenugreek, red chile, cumin and other spices.  By the way, the brand name Deep is pronounced with a soft d, and means "oil lamp".  Back to what I was saying - a few spoons of pickle masala, some raisins, a splash of white vinegar added to chicken is all it takes.  The result is almost magical.  If you find it too spicy, you can add half a cup of chopped onion to tone it down.   Also, be warned that the fenugreek renders a slightly bitter flavor that is an acquired taste, to be sure.  You can add more raisins to neutralize the bitterness.  

    Please feel free to critique this recipe if you try it.  Good luck! 


    "PICKLE MASALA" CHICKEN

    2 lb boneless, skinless chicken, cut into 1inch pieces
    2-3 tbsp pickle masala (more if you can handle it)
    1 tbsp black raisins
    2 tbsp + 3 tsp white vinegar
    2 tbsp canola or vegetable oil
    1/2 cup chopped onion (optional) 2 tsp coarse salt
    Chopped Cilantro to garnish


    • Wash the chicken and pat dry with paper towels.  
    • In a blender, grind pickle masala and raisins with 2 tbsp vinegar into a smooth paste.  
    • Marinate the chicken in this paste for about 1/2 hour.
    • Heat the oil in a fry pan.  
    • If using onions, fry them in oil until golden brown.  
    • Add chicken and salt.  Cook on high heat, stirring together, for 10 minutes.  
    • Lower the heat and cook covered for about 15 minutes.  
    • Turn up heat again and cook, stirring constantly until excess liquid has evaporated. 
    • Turn off the heat and let the dish sit for about an hour to cool.  
    • Stir in remaining 3 tsp white vinegar. 
    • Garnish with cilantro.  
    • Serve with white rice or hot chapattis.

    Saturday, August 13, 2011

    Facing East

    Almost a year ago, I wrote a blog titled Armchair Travel, One Meal At A Time.  It was a review of a restaurant appropriately named Facing East.  Since then, I have had the opportunity to visit this restaurant three more times to dine in, the last two times in the past week.  The lone comment on the blog mentioned above was from my cousin Rachel, an avid food lover and blogger in her own right.  My post ended with an invitation from me to anyone interested in joining me at Facing East, and Rachel posted that she would go with me.  Fast forward to almost a year later and here we were, thanks to some car trouble that had us change our plans at the very last minute.


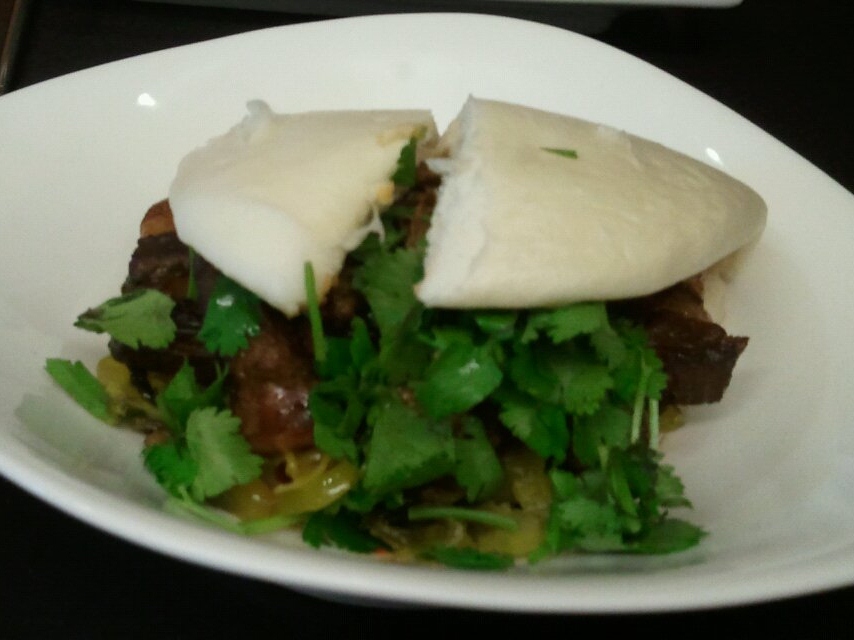
    Taiwanese Pork Burger
    It was a Friday evening, so the wait for a table for two was about twenty minutes long.  With the great company I had, time seemed to move along quickly enough. Once we were seated and looked at the menu, we absolutely HAD to order the Taiwanese Pork Burger, a tried-and-tested true favorite.  We also ordered the Taiwanese Chow Mein, which was soft noodles with seafood and pork in a light sauce.  For our third entree, we chose the Lamb in Barbecue Sauce with a side of steamed rice. 


    As always, the food did not disappoint.  The Pork Burger tasted amazing delicious as always.  The steamed bun held together a medley of ground pork, grilled onions, pork belly and a generous garnish of cilantro.  The Chow Mein was cooked just right, not too soft, not starchy.  The flavors and textures of the noodles, seafood, pork, green vegetables and sauce blended very well.  The sliced lamb with its leafy vegetables, sliced red peppers and thick slices of garlic tasted just wonderful on top of steamed white rice.  The portions seemed quite large.  Or maybe it was the great company and lovely conversation.  Either way, I ended up taking quite a bit of food home with me.  On the previous occasion I was there, we had ordered the Soy Chicken, also known as Three Cup Chicken.  I could taste a strong flavor of star anise amid the chicken, soy sauce and large cloves of fried garlic.  Both times the food was between $12 to $15 per person, with tip.  Quite reasonable, for the quality and quantity you get.


    Lamb in barbecue sauce
    I would be remiss if I didn't mention the waitstaff, that contribute to the positive experience of visiting Facing East.  I was very impressed by how organized everything was despite how busy they were.  The waitstaff are always polite and attentive.  When we were finally seated at our table, the hostess who handed us our menus apologized for the long wait.  It isn't their fault that they are so popular, there was no reason for an apology.  When we ordered the Taiwanese Pork Burger, the waiter made sure to ask us if either of us were allergic to peanuts.  It was really good that he asked, because Rachel is allergic, so they made sure not to add the ground sugar-coated peanuts they usually sprinkle on top.  Also, I had placed two orders of Pork Burgers to go.  I had assumed that it was packed with the leftovers, but it wasn't.  One of the waiters came running out of the restaurant to find us and give us our to-go order.  I would have been very disappointed if I went home and found my order missing. 


    Taiwanese Chow Mein
    The food is great and the prices are decent, which is what makes for a long wait.  But the wait is worth it.   The decor is pleasant, but the tables are very close to each other.  When the place is busy, it is really busy.  That is something you have to contend with, but again, I'm not complaining.  The best time to dine in is any evening or on Sunday for lunch.  If you decide to go any weekday afternoon, your parking options are very limited.  Although an internet search indicates that the restaurant is closed on Mondays, this no longer seems to be the case.


    Facing East does not take reservations.  Call ahead for take-out.  Get there early so you don't have to circle the block for parking.


    FACING EAST TAIWANESE RESTAURANT
    1075 Bellevue Way Northeast
    Bellevue, WA 98004 
    (425) 688-2986 ‎

    Open Mon-Thu 11:30am-9pm; 
    Fri-Sat 11:30am-10pm; 
    Sun 11:30am-8pm


    Saturday, July 16, 2011

    Something Differently Good

    Mexican Food.  What's not to love?  Bold, hearty, flavorful, it is as vibrant as its people.  I have heard Mexican food compared to Indian food, what with the liberal use of spices like cumin, chile powder and garlic in both cuisines.  Both Indian and Mexican food have rice or tortillas, or in the case of Indian food - chapattis, to accompany them.  My first ever attempt at Mexican cooking found that to be far from true.  Each cuisine has its own complex flavors and is quite different from the other.

    There is a show on PBS called Pati's Mexican Table.  Although I have never watched the show, someone I know stumbled upon it and watched Pati make Chilorio Burritas.  They suggested that the dish was simple to make and I should try my hand at it.  Thus began my adventure.  There were two things I found really interesting about this recipe.  It blew away all the myths I had about Mexican food.  I always thought Mexican food involved tomatoes and beans.  Neither of these were part of the recipe.  Also, the base for the sauce in this recipe was rehydrated ancho chiles.  

    Whenever I attempt to make something I've never cooked before, I follow the recipe to a T the first time around.  During the second attempt I make modifications to the recipe to suit my personal taste. During my first attempt at this recipe, I used lean pork because that was all I had in the refrigerator.  I think the lean pork made a significant difference to the dish overall, because it felt like it was lacking a certain something.  I also discovered that the amount of spices called for in the recipe were way too little for me.  Additionally, serving them with whole wheat tortillas did not allow for the flavors of the dish to come through.  Don't get me wrong, it tasted wonderful.  It just felt like I could make many tweaks to the recipe to make it much more enjoyable to me.

    My second attempt had me use chicken thighs instead of pork.  I used skinless, bone-in chicken thighs, trimmed of all visible fat.  I cooked them in orange juice, without water.  I think a beef brisket will also work very well for this recipe.  It will need more time to cook, of course.  The other change I made was instead of blending the onions and garlic raw with the other spices, I sauteed them in a little oil first.  I also upped the spice ante big time.  I left the seeds and veins in while hydrating the ancho chiles.  I even added some crushed red peppers.  Finally, I served the dish with flour tortillas, sprigs of cilantro, chopped green onions and slices of avocado.   The result was an amazingly piquant, delicious filling in a soul-satisfying warm tortilla.  It just made me want to get up on on the table and dance.  Almost.  My only regret is that I didn't take pictures so I could post them here.  Oh well, there's always a next time.

    If you prefer your food mild to moderately spicy, I recommend you go with the original recipe, but here is the modified recipe I used.


    CHILORIO BURRITAS


    4 lbs skinless chicken thighs, bone in, trimmed of all visible fat
    1 1/2 cup freshly squeezed or high-pulp orange juice
    1 tsp kosher or sea salt
    3 dried ancho chiles, tops and seeds removed
    1 cup boiling water

    2/3 cup apple cider vinegar
    1 onion, roughly chopped
    6-8 garlic cloves
    1/2 cup fresh parsley
    3 tsp dried oregano
    1 tsp ground cumin
    1 tsp black pepper
    1/2 tsp kosher or sea salt

    2 tbs vegetable or canola oil

    Place the rinsed chicken thighs in a large heavy pot.  Pour in orange juice, add a teaspoon of salt and set over high heat.  Once it comes to a boil, bring the heat down to medium and let it simmer for about 20 to 30 minutes, or until most of the liquid has evaporated and the meat is thoroughly cooked.

    Meanwhile, remove the stems from the chiles.  Place them in a bowl, cover them with boiling water, and let them sit and rehydrate for about 10 to 15 minutes.  Saute the onions and garlic in a little oil.  Place the chiles and  their soaking liquid in the blender along with the onion, garlic, parsley, oregano, cumin, black pepper, salt and vinegar, and puree until smooth.

    Once the meat is ready, place it in a bowl along with any remaining cooking broth.  Once it is cool enough to handle, remove the bones and shred the meat with your hands or using two forks. 


    In the same pot in which the meat was cooked, heat the oil over medium heat.  Pour in the chile sauce and let it simmer for 6 to 8 minutes.  Toss in the shredded meat along with any of its remaining cooking broth.  Let the meat cook, stirring often, until it has absorbed most of the chile sauce, which will have thickened and changed color to a much darker tone. Add more salt if necessary.


    Spread 2-3 tablespoons of the chilorio down the center of a warmed flour tortilla.  Garnish with sprigs or chopped cilantro, chopped green onions and two slices of avocado.  Roll into a burrito and serve.


    Saturday, July 2, 2011

    Berry Crazy

    I love summer in the Pacific Northwest.  The sun comes out, the rain is on a short hiatus (short being the operative word) and everyone is happy.  It makes me realize what Perry Como was singing about when he sang about "Seattle".  And then there are the berries.  Strawberries, Raspberries, Blueberries, Blackberries.  Berry picking is one of my favorite activities, although not always possible to do.  No worries though, because they are stocked in grocery stores and farmers markets. What better time then, to serve up some berry-laden cake during our monthly Birthday celebration at work?

    For years I have enjoyed the bounty of berries on top of a Best Ever Sponge cake, filled in the center and piled high with whipped cream and fruit, like the one on the right.  Not because of any health or dietary restrictions, the only reason I have always gone with this selection was because it produces a light-as-air cake that pairs well with the whipped cream and berries without weighing it down or stealing the limelight.   It was now time to turn this regular cake into its miniature counterpart.  I didn't think the Best Ever Sponge would work because the cake would stick to the paper cups due to the lack of butter/oil.  So off I went in search of the right recipe to (no pun intended) take the cake.  
    I happened to come across Martha Stewart's Vanilla Cupcake Recipe.   I baked four dozen cupcakes, frosted and decorated them, then took them to work.  Normally I don't eat what I bake.  But (1) These were Berry Cupcakes and (2) I had never made them before.  I took one bite and....umm.....no.  The cupcakes were terrible.  They were dense and dry.  I decided not to serve them because of how bad I thought they were.  I put them into a refrigerator without knowing what to do.  I hung my head in shame and sent out an e-mail to my co-workers to let them know there was not going to be any cupcake for them as expected.   I promised to make it up to them another day.

    My co-workers, being the wonderful people that they are, attacked the refrigerator and polished off the not-so-perfect cupcakes.  I began to get e-mails and instant messages telling me that there was nothing wrong with them, and that they were being enjoyed by everyone.  This is the very reason why I think my co-workers are deserving of much more than those horrible, hard-as-rocks cupcakes.  

    Anyway, long story short, my next attempt was Martha Stewart's White Cupcakes.  Sifted cake flour and egg whites make for a light and moist cupcake in this recipe, so much better than the Vanilla Cupcakes.  As much of an improvement as they were, I am still in search of the perfect cupcake recipe that will do justice to the berries and cream.  

    The White Cake Recipe is below.  Before you begin, make sure all the ingredients are at room temperature.  While waiting for the cupcakes to cool, prepare berries.  Wash and dry each of the berries separately.   Use a large bowl filled with cold water.   Drop the berries in, then run your fingers gently in the water to loosen any dirt from the berries.  Lift the berries out of the water and place on a paper towel to dry.  When they are dry, hull the strawberries and cut into slices.  Halve the blackberries vertically if they are too large.  Place the mixing bowl and beaters in the freezer for 1/2 hour prior to making the whipped cream frosting.   Find a bowl larger than the mixing bowl and line the bottom with ice cubes.  Place the mixing bowl into the larger bowl and place ice cubes between the two bowls.  This will ensure that the whipped cream beats up cold, light and airy.


    MARTHA STEWART'S WHITE CUPCAKES
    (Yield: 24 cupcakes)


    3 1/4 cups sifted cake flour
    1 1/2 tablespoons baking powder
    1/2 teaspoon salt
    1 tablespoon pure vanilla extract
    1 cup plus 2 tablespoons whole milk
    1 3/4 sticks unsalted butter (1/2 cup plus 6 tablespoons)
    1 3/4 cup granulated sugar
    5 large egg whites

    • Preheat oven to 350 degrees F.  Line 2 standard cupcake pans with paper cups.  
    • Sift together cake flour, baking powder and salt 3 times, to mix thoroughly and incorporate with air.
    • Add vanilla to milk.
    • Using an electric mixer on medium-high,  cream butter and sugar until pale and fluffy.  
    • Reduce speed to low.  Add flour mixture in three batches, alternating with milk, and beating until well combined after each.  Scrape the sides and bottom of mixing bowl occasionally to make sure all ingredients are mixed well and free of lumps.
    •  In a separate bowl with electric mixer on medium speed, whisk the egg whites until stff peaks form.
    • Fold 1/3 egg whites into batter lightly using a wire whisk.  Then using a spatula, gently fold in remaining egg whites in two batches.
    • Using an ice cream scoop, fill lined cups 3/4 full.  Once filled, tap each cupcake pan once on counter top to release any air bubbles.  
    • Bake in center rack of oven, rotating tins halfway through, about 20 minutes.  Check to see if done by inserting a toothpick into the cupcakes in the center of the pan.  Toothpick should come out clean.
    • Cool cupcakes in pan about 10 minutes then transfer to wire rack and cool completely for at least an hour before frosting.
    • Top with whipped cream frosting and berries. 


             WHIPPED CREAM FROSTING

             1 1/2 cups heavy whipping cream
             3 1/2 tablespoons granulated sugar 
    • Prepare mixing bowl and beaters as mentioned above.
    • Pour the whipping cream into the mixing bowl and begin beating at low speed.  
    • Add granulated sugar and continue beating, slowly increasing the speed.  
    • Put a star nozzle into a pastry bag and snip off the tip.
    • Fill the pastry bag about 2/3 of the way with whipped cream frosting.  
    • Frost cupcakes with swirls.  Top with berries.

    Sunday, May 22, 2011

    Miniaturizing Another Favorite

    I don't know if you are aware of this dear reader, but there was a time I was vehemently opposed to the popularity of the cupcake concept.  I really don't know why.  I spent most of my time resisting jumping the bandwagon, thinking cupcakes were a passing fad that wouldn't last. Now here we are a few years later, with the cupcake alive and well and gaining even more popularity. Every once in a while now I feel a twinge of regret of what could have been.  Had I relented sooner, I could have begun turning my repertoire of cakes into cupcakes months and months ago.  Now that I am as cupcake crazy as the next person, I am thoroughly enjoying myself with my experiment in miniaturization.  I have some very willing co-workers, who are more than happy to partake of the results of my attempts.

    A few months ago, a co-worker who was celebrating his birthday sent me a recipe for a German Chocolate Frosting.  No recipe for any kind of cake, mind you, just a recipe for frosting.  I guess that was his way of hinting what he wanted me to bake for our monthly birthday celebration.  Never having made  a German Chocolate Cake before, this was a double challenge for me.  My first-ever attempt at this cake and at the same time shrinking it down.  It was time to read up about this cake as I could so I could meet the challenge armed with as much knowledge as possible.  I learned that German Chocolate Cake had nothing to do with the country of Germany.  Go figure!  Rather, the recipe was one owned by a family with the last name German.  It was originally known as German's Chocolate Cake.  The apostrophe and the "s" were dropped somewhere along the way.  Be that as it may, this cake is simply delicious!  I fell in love with the complex symphony of flavors and textures the first time I ate it.  Rich, moist chocolate cake, crowned with sweet flaked coconut and crunchy pecans held together by a caramel flavored custard-like frosting.  Divine!

    For my base recipe, I went with Hershey's "Perfectly Chocolate" Chocolate Cake.  I used two standard cupcake pans instead of the 9 inch round pans suggested in the recipe.  For the topping I used the German Chocolate Cake Frosting sent by my co-worker, but made a few slight modifications.  The Coconut Pecan Frosting recipe I have posted below makes enough to generously frost 24 cupcakes, because the last thing you want is to run short.  Despite all its gooey goodness, I will admit that the cupcake version could use a little help in the looks department.  The next time I will pipe a chocolate frosting around the edge, much like its regular-sized counterpart.  Hopefully this will lend to the cupcakes' aesthetic appeal.  But as my nephew would say, "This cupcake may look horrible but tastes fabulous".  That's what his comment on the Red Velvet Cupcakes I made and took over to him.  Yes, Nicholas believes in telling it like it is.

    So here you have it, German Chocolate Cupcakes.  If you do happen to make them, any feedback will be greatly appreciated.  Enjoy!


    GERMAN CHOCOLATE CUPCAKES

    CUPCAKES

    1-3/4 cups all-purpose flour
    2 cups sugar
    3/4 cup Dutch Processed Cocoa
    1-1/2 tsp baking powder
    1-1/2 tsp baking soda
    1 tsp salt
    2 eggs
    1 cup whole milk
    1/2 cup vegetable oil
    2 tsp pure vanilla extract
    1 cup boiling water

    • Line two standard cupcake pans with paper cups.
    • Preheat oven to 350 degrees
    • In a large mixing bowl and using a wire whisk, combine flour, sugar, cocoa, baking powder, baking soda and salt.
    • Add eggs, milk, vegetable oil and vanilla and mix well on medium speed using a hand-held mixer.
    • When combined, slowly add boiling water and stir thoroughly.  Batter will be thin.
    • Using a standard ice cream scoop, fill each cupcake cavity with batter.
    • Bake cupcakes about 10 minutes, then turn the pans around to ensure that cupcakes bake evenly.
    • Bake cupcakes for another 10 minutes or until toothpick inserted into the center of the cupcakes come out clean.
    • Remove cupcake pans from oven and cool for 10 minutes.
    • Remove cupcakes from pans and cool on a wire rack for 2-3 hours before frosting.

    COCONUT-PECAN FROSTING

    1 large and 1 small can evaporated milk
    1-1/2 cups white sugar
    5 egg yolks, lightly beaten
    1-1/2 sticks unsalted butter
    2 tsp pure vanilla extract
    1-1/2 cups chopped pecans
    1-1/2 cup flaked coconut

    • In a large saucepan combine evaporated milk, sugar, egg yolks, margarine and vanilla.
    • Cook over low heat, stirring constantly, until thick.
    • Remove from heat and stir in pecans and coconut.
    • Spread on cupcakes while frosting is still warm.
    • If frosting cools, warm it up over a saucepan of simmering water.
    • Top each cupcake with a pecan half.
    • If piping edges of cupcakes with chocolate frosting, wait for coconut-pecan frosting to cool before doing so.

    Saturday, May 14, 2011

    Caramel Bliss

    I love caramels. Love, love, love them.  Luscious, rich, sweet little squares of goodness that make you want to close your eyes as you savor the slightly burned sugar with the added complex flavors of butter, vanilla and salt.  

    Seeing as I love to experiment making things from scratch, I went in search of a good caramel recipe.  I tried a few, some of which were disastrous flops.  Others didn't come out quite right.  They were either too chewy, which made my jaws hurt, or the butter separated from the sugar during the cooking process.  I finally came upon Carole Bloom's recipe for Classic Cream Caramels from her book "Truffles, Candies & Confections - Elegant Candymaking in the Home".  The author describes these as "Truly the quintessential caramel.  They are chewy and creamy and just plain good".  I have to agree. 

    There are a few lessons I've learned while making caramels, which I would like to share with you so you know what you're getting yourself into (insert smile icon here).  I don't mean to intimidate you with that statement, I just wish someone had told me these things prior to my experimentation.
    • While I absolutely support the idea of having children help in the kitchen, this may be one of those situations where you may want to have them go play outside.  They can help measure the ingredients, but I would advise against having them doing the stirring.  Cooked sugar can scald when hot, with extremely painful results.  
    • Keep a bowl of ice water near you while cooking caramels.  If you happen to burn yourself with cooked sugar, immediately dunk the burned area in ice water to ease the pain.
    • Making caramels requires a good amount of stirring.  If you have a physical ailment that may cause joint pain, you may have some difficulty with the process and may want to solicit help.
    • Never make caramels on a rainy day.  The corn syrup and sugar will absorb moisture from the air and the caramels will end up a gooey mess that won't hold their shape.
    • Use a metal spoon to stir the caramel.  Avoid using a wooden spoon as these tend to absorb odors and flavors when previously used.  If you have to use a wooden spoon, use a brand new one save it just for making caramels.
    • Have a good pastry brush available to wash down the sides of the pan when cooking the sugar.  This is very important to avoid sugar crystallization.  It makes sense to invest in a good quality plastic or silicone-bristled pastry brush.
    • Make sure to have an accurate thermometer, because temperatures are key to successful caramels. Use a deep-fry thermometer but avoid the cylindrical ones that have a temperature bulb at one end and a clip at the other.  The bulb will need to touch the cooking sugar while it avoids touching the sides of the utensil which is diffuclt to do because of the clip.  Go for the immersible deep fry thermometer like the one pictured right.  It costs around $10.
    • Once the caramel has been poured into the sheets to set, do not scrape the caramel from the sides and bottom of the cooking utensil.  Instead, add some milk or cream and reheat the leftover caramel until it melts into a viscous syrup.  Pour into a glass bottle and use it to top ice cream
    • Never store caramels in the refrigerator for the same reason that you want to avoid making them on a rainy day.
    • Wrap caramels in cellophane paper or wax paper made for this specific purpose.  Commercial wax paper available in a roll cannot be twisted and will tear. Sur La Table's caramel wrappers were large squares of parchment paper, which you want to avoid.  Michael's craft store sells cellophane paper by the roll in many different colors.  I use Confectioners Wax Paper which I buy online from Country Kitchen SweetArt.  I buy the packet of 500 and cut them in half because each square is quite large.  Amazon.com offers some choices as well, but they are slightly more expensive.
    Now for the recipe.  Drum roll, please. Here we go!


    CLASSIC CREAM CARAMELS


    2 cups sugar
    1 cup light corn syrup
    2 tbsp unsalted butter, softened
    2 cups heavy whipping cream
    1/2 tsp salt
    2 tsp pure vanilla extract


    • Line a 13 by 9 baking sheet with aluminum foil.  Coat the foil with vegetable oil and set aside.
    • In a heavy-bottomed deep saucepan, combine sugar and corn syrup over medium heat and stir constantly until the mixture comes to a boil.  Wash down the sides of the pan a few times with a pastry brush dipped in warm water, to prevent the sugar from crystallizing.
    • Place a candy thermometer in the saucepan.  Increase the heat to medium high and cook the mixture, without stirring, until it registers 305 degrees on the thermometer.
    • In the meanwhile, in a separate saucepan, heat the cream over medium heat.
    • Add the butter, a little at a time, to cooked sugar.  Keep the mixture boiling on low heat.  Slowly add the cream and continue cooking, stirring vigorously, until the caramel registers 250 degrees on the thermometer.
    • Remove the saucepan from the heat and let stand for about 5 minutes.  Add the vanilla and salt and stir well.  
    • Pour caramel into prepared baking sheet.  
    • Allow caramel to set for 5 to 6 hours, then mark the caramel with a knife.  This will make it easier to cut it into pieces when set.
    • Cool the caramels for an additional 2 hours until firm.  
    • Coat a cutting board and a sharp knife lightly but thoroughly with vegetable oil.
    • Remove caramel from the baking sheet and carefully peel off the aluminum foil.  Set the caramel on the oiled cutting board.
    • Using the oiled knife and with a sawing motion, cut the caramels into bite-size pieces.  Wrap immediately and store in an airtight container.  
    • DO NOT REFRIGERATE.  The caramels will keep for two weeks.
    The base recipe yields caramels that taste wonderful all on their own, but lends itself to many variations.  I have added chopped pecans, used it as a filling for caramel truffles and dipped the set caramels into dark chocolate and topped with a pinch of Fleur De Sel.  Feel free to play around and come up with your own creations.


    In the words of the inimitable Julia Child, Bon Apetit!